![]()
Introduction
Quick start
XTC in
detail
Technical notes
XTC (Xml Tree Compare) is a differential tool for XML files.
The intention of the program is to have a
'change detection'-tool for two versions (an old and a new one for
example) of a file.
The compare process is kept as generic as possible. The XML
documents must be well-formed and that is the only presumption, so
XTC can be used for any XML-related format such as SVG, XVL, etc...
The result of the compare process is written into a file (result
file). There is also a result visualization, showing the XML
structure as trees including the marked changes.
XTC is
useful for:
Producing a result file from the compare process that can be used in further processes (e.g. XSLT, see also http://xmldifftool.com/xtc_xslt_en.html).
Comparing XML files 'on the fly' and see the changes immediately in the visualization.
Using the server edition for long running compare processes with large files (the file size is limited only by the available memory on your machine).
XTC can be integrated in other processes by using the server edition like a batch process.
A) Gui version:
1. Start XTC by double clicking on the program
icon or by selecting the menu entry in the 'programs'-menu of your
windows installation. The program's main window appears. Select two
XML files to be compared by using the buttons 'XML file 1' and 'XML
file 2'. Once the files have been selected their paths are shown left
to the buttons in the white line edit boxes.
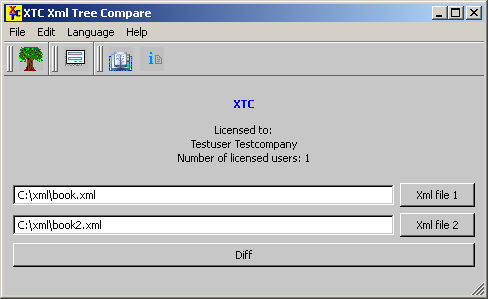
2. Press the large button 'Diff'.
3. Depending on the
sizes of the selected files and the hardware of your computer the
comparison may take some seconds. XTC will turn the mouse pointer
into an hourglass symbol to indicate that the process is running.
4.
A message box informs you as soon as the comparison is finished.
5.
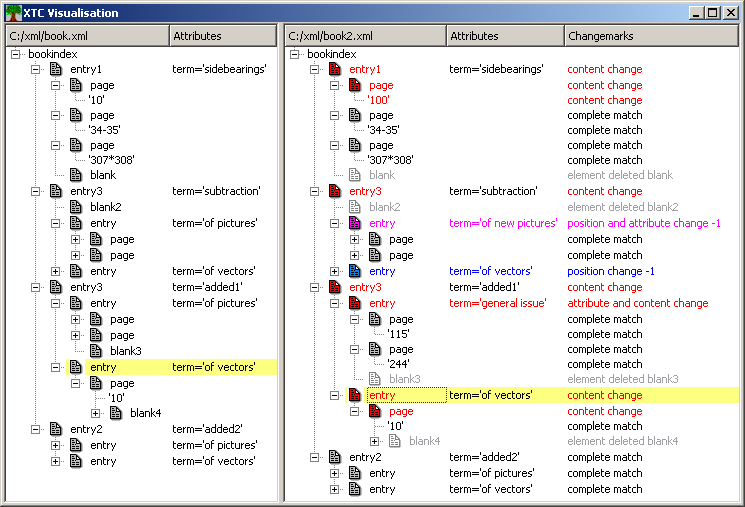
After the compare process has finished the result can be viewed by
pressing the leftmost button on the tool bar (showing the tree
symbol) or by choosing the menu entry File->Visualization. A
separate window opens showing the XML structure of XML file 1 on the
left hand side and the structure of XML file 2 with changes on the
right side. The visualization is interactive: If an element in one of the
trees is selected, the corresponding element in the other tree and the
selected one are highlighted
(note that added or deleted elements don't have a corresponding element).
B) Server edition:
1. Open a shell (DOS box on Windows) and
enter the directory where the XTC executable is stored.
2. Type
'xtc.exe xmlfile1 xmlfile2 -batch' where 'xmlfile1' is the path to
the first of the to XML files, 'xmlfile2' is the path to the second
XML file.
3. Depending on the sizes of the selected files and the
hardware of your computer the comparison may take some seconds.
4.
After the process has finished, a result file can be found in the
directory where 'xmlfile2' is stored. If you can't find the result
file, please check the configuration file (xtc_cfg.xml in the current
directory or, alternatively in your home directory) for the
<writeresultfile> entry. It must look like
this:
<xtcparam_bool name="writeresultfile">1</xtcparam_bool>.
Or
check the log file xtclog.txt if an error occurred during the
comparison.
Result file example (fragment):

The comparison of XML documents can be motivated by different intentions, such as taking a quick view on what has changed since the last revision of a document. Or by tracking changes in a further step of your XML processing, for example if changes have to be marked in a rendered version of the XML file. Also quality assurance purposes may need the comparison of XML, for example if drawings are stored in an XML related format (such as SVG). A comparison of two versions can reveal all changes, even very small ones not even visible in a graphical editor.
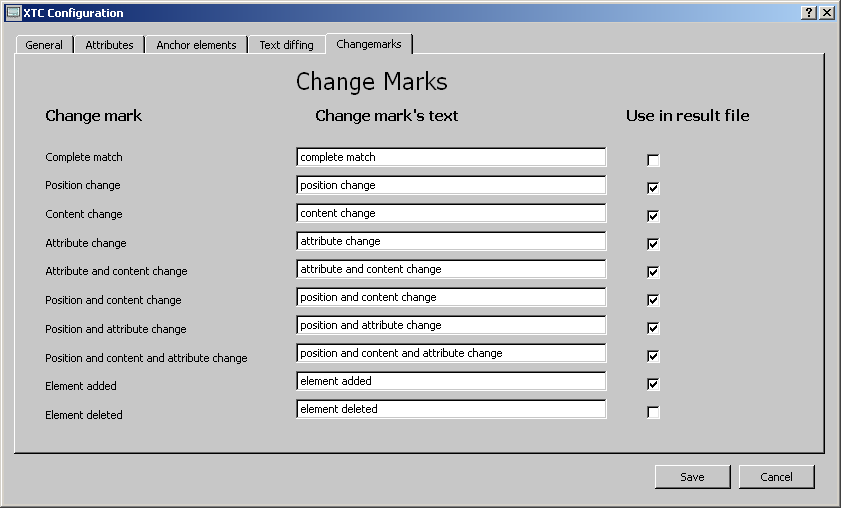
Changes are marked in the result file by adding change marks. A
change mark is a processing instruction, it describes the compare
result for the following XML element. For each XML element in file B
the compare process results in one of the following ten change marks:
complete match
position change
content change
attribute
change
attribute and content change
position and content
change
position and attribute change
position and content and
attribute change
element added
element deleted
Four
change marks (position change, position and content change, position
and attribute change, position and content and attribute change)
indicate that the element has moved. The distance of the move
(relative to the parent element) is indicated by a number added to
the change mark, it displays the position difference to the element's
former position in file A. A number greater then zero indicates a
'move fore ward', that means the distance to the parent element is
greater then before (e.g. because a new element has been added in
between). A number smaller than zero indicates that the element now
is nearer to its parent element (e.g. because an element has been
deleted in between)
Example:
file
A:
<parent>
<one/>
<two/>
<three/>
</parent>
file
B:
<parent>
<one/>
<two/>
<hundred/>
<three/>
</parent>
The
result will be:
<parent>
<one/>
<two/>
<?XTC
element added?>
<hundred/>
<?XTC position change
1?>
<three/>
</parent>
(In this
example 'complete match' change marks have been omitted for the sake
of simplicity).
Note that the change marks (here <?XTC element
added?>) do not count when calculating the distance of a move,
because they are not 'real' content of the document. Other processing
instructions (non XTC processing instructions) count as normal
content.
The change marks are also used in the visualization.
To apply to a large variety of use cases, XTC has been designed as
a generic tool. Being well formed is the only presumption made to the
files that are to be compared. As with any generic tool XTC has to be
configured to serve the user's needs as good as possible. XTC's
configuration options will be explained in the following text.
Note: the following text assumes that you use the gui
version. If you have the command line version only, you must
configure XTC by editing XTC's configuration file xtc_cfg.xml. The
configuration file is located in the current directory or in your
home directory. XTC looks into the current directory first and if no
xtc_cfg.xml found into the user's home directory.
Start the
XTC gui (see Quick start). Press the second button on the toolbar or
choose the Edit->configuration menu. A dialog box opens showing a
tabbed dialog consisting of four tabs ('General Settings', 'Anchor
Elements', 'Text Diffing' and 'Change Marks').
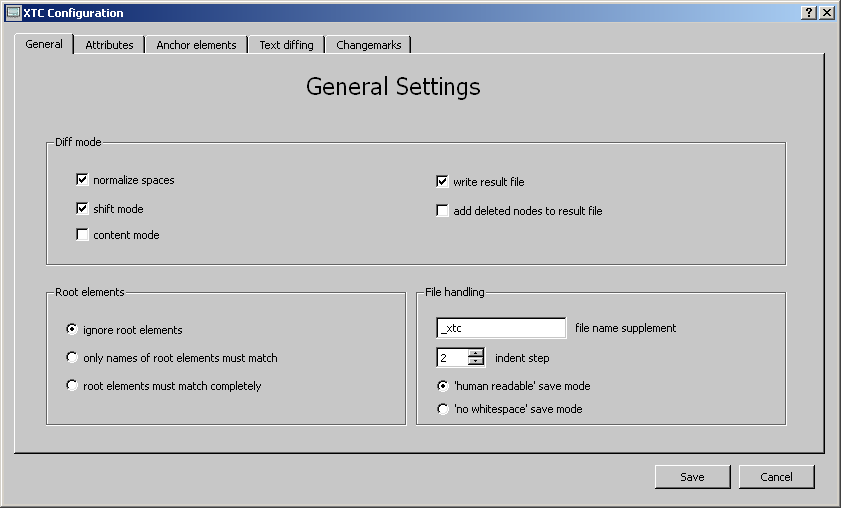
The 'Diff mode' group configures the basic features of the
comparison.
normalize spaces: Reduces multiple spaces to one and eliminates carriage returns and tabs inside texts (during the compare process only). This is useful since some editor programs add undemanded spaces and carriage returns.
shift mode: In situations where XML elements of the same parent sharing the same name have changed both their positions and their contents the change situation may be ambiguous. Due to this lack of information the compare process can't always decide if an element has changed or has been added as new (sometimes even a human processor would not be sure). If 'Shift mode' is toggled, the program tries to match the 'most similar' element (using a smallest distance algorithm).This works well in many cases, but it can sometimes lead to unwanted results. Without the shift mode such elements are marked as 'added' (and its possible counterparts as 'deleted'). See also section 'Anchor elements' for a more sophisticated approach to deal with the problem.
content mode: Using the content mode the algorithm tries to
find the appropriate counterpart of an element by examinig its
textual content (all text nodes in the subtree without the
attributes). The counterpart will be the element with the most
similar text. Example:
File
A:
<para>some text</para>
<para>old
story</para>
<para>a lot of new stuff</para>
File
B:
<para>new story</para>
<para>a lot of
newest stuff</para>
<para>some text</para>
In
the example we have three elements with the same name. In file B the
order of the elements has changed and some text changes have
happened. The content mode algorithm now examines the texts and will
find the right counterparts by text similarity:
<para>old
story</para> ------------- <para>new
story</para>
<para>a lot of new stuff</para>
--- <para>a lot of newest stuff</para>
<para>some
text</para> ------------ <para>some
text</para>
Note: In rare cases the content mode may lead to
unexspected results in some cases. If you get a strange looking
result, try the comparison without the content mode.
Note:
The content mode works also on large elements containing lots of
subelements, so it can extend the program's run time.
write result file: Untoggle this
if you don't need the result file and you are interested only in the
visual representation.
Note: Writing large files to the file
system can be time consuming. With large XML files the time for
writing the result file to disk may take longer than the compare
process itself. This is not a problem of XTC but of the underlying
file system.
add deleted nodes to result file: If toggled, elements which are part of file A but not part of file B are added to the result file, marked as 'deleted'. Important note: This may lead to a result file that is no longer a valid XML document (the result file is always well formed but using this option can lead – depending on your DTD or schema - to a non valid result document)!
'Root elements' defines, how XTC will handle the XML root
elements, since they are not part of the diff process (this is needed sometimes for the use of XTC in batch mode).
ignore root elements: Choosing this option enables the comparison of files with different root elements.
Only names of root elements must match: the XML documents must have root elements with identical names, but attributes may differ
root elements must match completely: names and attributes of the root elements must be the same, the only difference allowed is the attribute order.
'File handling' sets parameters for the writing of the result file
file name supplement: The result file is a copy of the second XML file ('file B') supplemented by the change marks and it is located in the same place. To prevent overwriting, the file name is extended by the additional string. Example: Assuming file name of file B (second of the XML files) is 'book2.xml' and the name addition is '_xtc', the result file's name will be 'book2_xtc.xml'.
Indent step: Indicates the number of spaces nested elements are indented by in the result file (applies only for 'human readable' save mode)
save mode: 'human readable' writes the XML tree by using a separated line for each element, indent nested elements etc... 'no whitespace' saves the the XML tree into one single line, no spaces,carriage returns or tabs between the elements. This can make further processing (e.g. by XSLT) easier since no dealing with whitespace is necessary.
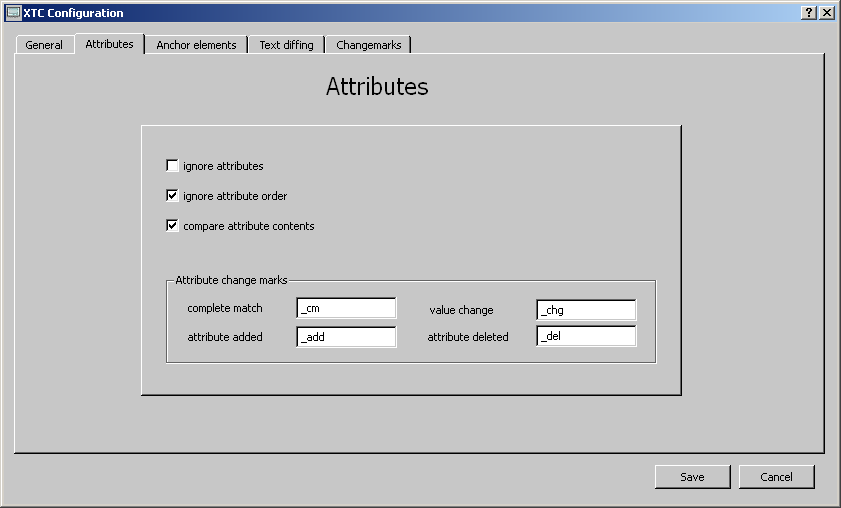
ignore attributes: if toggled, attributes are excluded from the comparison
ignore attribute order: if toggled, attributes are regarded as unchanged if a different order is the only difference; if untoggled, the attribute order is a matter of change detection
compare attribute contents:
If toggled, an element's attributes are compared to the attributes of its cuonterpart element.
Each attribute is examined wether it is unchanged (complete match)
its content has changed (value change)
newly added to the element (attribute added) or
the attribut has been deleted (attribute deleted).
To mark the changes the attributes are altered by adding 'Attribute change marks'
to the attribute name.
In case of a content change (value change) a textual comparison is applied to the attribute's value (see also the tab 'Text diffing', 'min length of common substring' and the text insertion marks are used here too).
Anchor elements are used to 'navigate' through the XML tree during the comparison. They serve as a 'hint' to the algorithm and can force the program to find the right counterpart of an element. An anchor is an XML node or an attribute that does not change its content, thus it is identical in both XML documents. If so, the element can serve as an anchor to its parent.
Example:
File
A:
<chapter>
<section>
<sectionmeta>
<sectionid>3</sectionid>
<sectionname>.....</sectionname>
</sectionmeta>
<para>....</para>
...
</section>
File
B:
<section>
<sectionmeta>
<sectionid>4</sectionid>
<sectionname>.....</sectionname>
</sectionmeta>
<para>....</para>
...
</section>
<section>
...
</section>
</chapter>
Here
the element <sectionid> can be defined as an anchor. If the
order of 'section'-elements has changed in the second XML document
and the element contents (apart from the 'sectionid'-element of
course) too, the program can now find the suitable counterelement
'section' by searching for its subelement 'sectionid' and compare its
contents. The matching of the anchor elements is a 'match of element
content', here the text child node of <sectionid>. The compare
functionality compares the texts of the whole subtree of the anchor
element (but omits attributes).
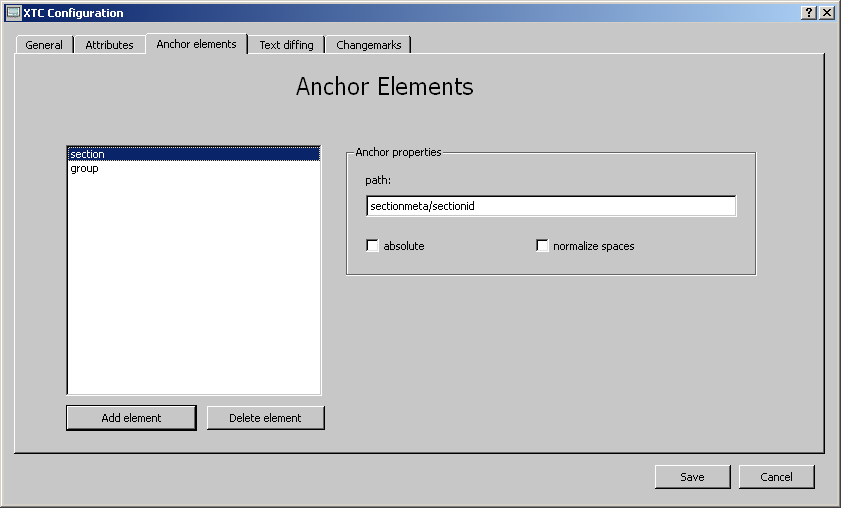
In this example the anchor
definition would be:
section sectionmeta/sectionid
(see
picture)
The path to the anchor element is separated by /
(slash).
Also attributes can be defined as anchors. An example would be:
<chapter>
<section>
<sectionmeta
id=”3”>
<sectionname>.....</sectionname>
</sectionmeta>
<para>....</para>
...
</section>
<section>
<sectionmeta
id=”4”>
<sectionname>.....</sectionname>
</sectionmeta>
<para>....</para>
...
</section>
<section>
...
</section>
</chapter>
Here
the anchor definition would be: section sectionmeta/@id The '@'
indicates that the anchor is an attribute.
To define a new anchor for an XML element, push the 'Add
element' button.
A small dialog window will appear, enter the
element's name and the path to the element's anchor:
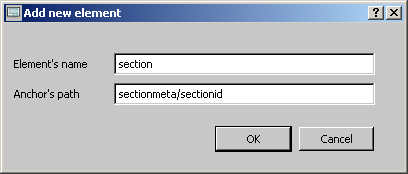
Only one anchor should be defined for an XML element. If more than on anchor is defined, only the last one is used. The anchor functionality for attributes works even when 'ignore attributes' is activated. Anchor elements that are defined but not found in the XML structure will be ignored.
As mentioned before an anchor serves as a way finding mechanism to
the element's counterpart. If an appropriate counter element can't be
found, two reasons can be distinguished:
1. The anchor's content
didn't match any anchor content from the other side (anchor
mismatch).
2. The element hasn't got the anchor that has been
defined in the configuration.
When the 'absolute' checkbox is
checked, elements with anchor mismatches are tagged as 'added' and
'deleted', while elements without the defined anchor remain
untouched. If the checkbox is not activated no such distinction is
made and all elements for which the anchor property is defined but no
counterpart could be found remain untouched.
Since the anchor's value is an element's content (a textual representation of it), a whole subtree can be an anchor's content. If checked multiple spaces are reduced and carriage returns and tabs inside texts are eliminated. This is useful since some editor programs add undemanded spaces and carriage returns.
To text elements that have changed their contents a textual
diff function can be applied. The 'enable text diff' checkbox
switches the text diff on and off. The algorithm classifies the text
into three categories:
unchanged (not marked)
inserted (marked with text insertion start / text insertion end)
deleted (marked with text deletion start / text deletion end)
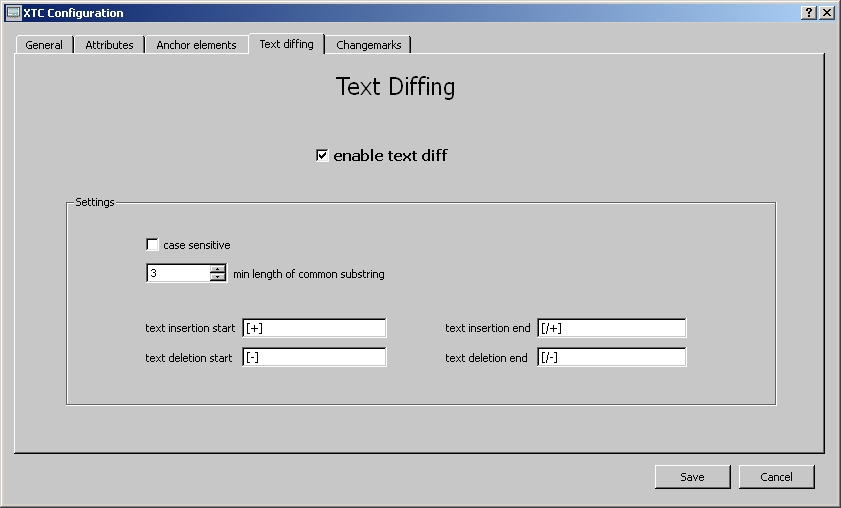
The Settings:
case sensitive: if toggled, the text comparison is case sensitive (the general XML comparison with XTC which is case sensitive by default).
Min length of common substring: The core functionality of the
text diff relies on the lcss (longest common substring) algorithm.
When two texts are compared, there can be often found several common
substrings of different lengths. This parameter defines of which
length a common substring must be at minimum, to be regarded as a
'valid', useful substring to deal with. Examples:
a)
text1:
“xml” text2: “xtc”
if the minimum lcss length is set
to 1 (the smallest value allowed) the result looks
like:
x[-]ml[/-][+]tc[/+]
“x” is the lcss and
remained unchanged. “ml” has been deleted, “tc” has been
added.
If the minimum lcss length is set to 2 the result looks
like:
[-]xml[/-][+]xtc[/+]
No lcss with length equal
or greater than 2 can be found now, so the lcss “x” is
insufficient and discarded.
b)
text1: “saturday”
text2: “sunday”
if the minimum lcss length is set to
1:
s[-]at[/-]u[-]r[/-][+]n[/+]day
if the minimum lcss
length is set to 2 (or 3):
[-]satur[/-][+]sun[/+]day
if
the minimum lcss length is set to 4:
[-]saturday[/-][+]sunday[/+]
For real (natural language) texts a minimum length for the
LCSS of 3 or 4 is useful.
Finally the text marks for insertion
and deletion can be entered. Default values are: [+] text insertion
start [/+] text insertion end [-] text deletion start [/-] text
deletion end
This tab provides the possibility to enter your own texts for the
change marks.
The checkboxes indicate if a change mark will
appear in the result document. Every change mark can be switched on
or off.
XTC is programmed in C++ using the QT library from Trolltech Nokia.
A special XML-API has been developed to assure
flexibility and very good performance of the tool.
XTC runs
under Windows 2000, XP, Vista, Windows 7
Versions for other operating systems will be delivered
on demand.
http://xmldifftool.com
Questions:
info@xmldifftool.com
Copyright © 2009-2012 Martin Achtziger